
에 의해 게시 에 의해 게시 Christoffer Winterkvist
1. If your project is organised across multiple directories, after you have selected the main project, you can add directories to be watched for file changes using the "Add Directory" menu item.
2. InjectionIII requires a version of Xcode more recent than 10.2, installed at the standard location /Applications/Xcode.app. For a project to be injectable, you must also add "-Xlinker -interposable" to the Debug target of its "Other Linker Flags" build setting.
3. You’ll be promoted to select the directory containing the project file and sources to give InjectionIII access to which files have changed.
4. InjectionIII is able to inject SwiftUI but requires minor code changes to "body" properties to ensure views are redrawn on injection.
5. This allows you to change the implementations of methods, functions and SwiftUI body properties without having to restart your app for rapid iteration over minor code changes and design.
6. The easiest way to do this is using the "Prepare Project" menu item after you have selected a project and it will make the necessary changes.
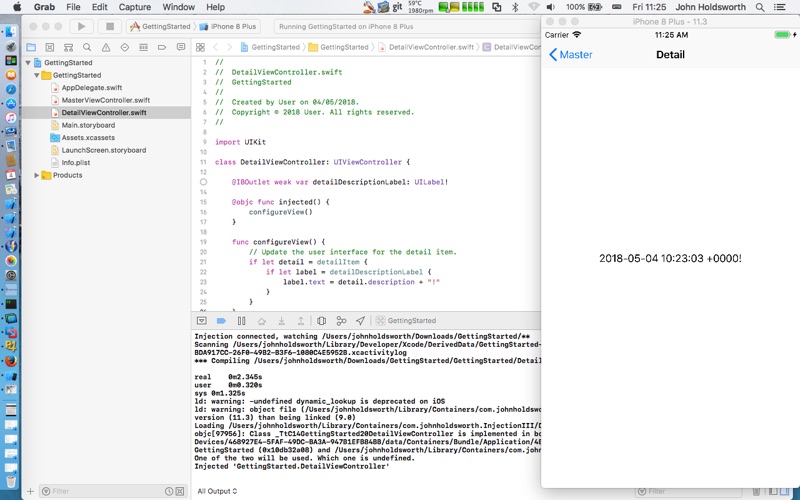
7. In the GettingStarted iOS app, if you edit the file DetailViewController.swift to change the string appended after the detail.description in function configureView() then save the file, you can see it take effect straight away.
8. Once injection has connected, when you save a file, it will be recompiled and injected into the running app, the new implementations taking place of the old.
9. Quite simply, InjectionIII adds "Hot Reloading" capability to your iOS, tvOS and macOS projects written in Swift or Objective-C.
10. Then, download the example project build and run it in Xcode.
11. Consult the project README on the support page for more information.
또는 아래 가이드를 따라 PC에서 사용하십시오. :
PC 버전 선택:
소프트웨어 설치 요구 사항:
직접 다운로드 가능합니다. 아래 다운로드 :
설치 한 에뮬레이터 애플리케이션을 열고 검색 창을 찾으십시오. 일단 찾았 으면 InjectionIII 검색 막대에서 검색을 누릅니다. 클릭 InjectionIII응용 프로그램 아이콘. 의 창 InjectionIII Play 스토어 또는 앱 스토어의 스토어가 열리면 에뮬레이터 애플리케이션에 스토어가 표시됩니다. Install 버튼을 누르면 iPhone 또는 Android 기기 에서처럼 애플리케이션이 다운로드되기 시작합니다. 이제 우리는 모두 끝났습니다.
"모든 앱 "아이콘이 표시됩니다.
클릭하면 설치된 모든 응용 프로그램이 포함 된 페이지로 이동합니다.
당신은 아이콘을 클릭하십시오. 그것을 클릭하고 응용 프로그램 사용을 시작하십시오.
다운로드 InjectionIII Mac OS의 경우 (Apple)
| 다운로드 | 개발자 | 리뷰 | 평점 |
|---|---|---|---|
| Free Mac OS의 경우 | Christoffer Winterkvist | 0 | 1 |
Quite simply, InjectionIII adds "Hot Reloading" capability to your iOS, tvOS and macOS projects written in Swift or Objective-C. This allows you to change the implementations of methods, functions and SwiftUI body properties without having to restart your app for rapid iteration over minor code changes and design. To get up and running, install the app to /Applications and run it and it will appear on the menu bar. Then, download the example project http://johnholdsworth.com/GettingStarted.zip, build and run it in Xcode. You’ll be promoted to select the directory containing the project file and sources to give InjectionIII access to which files have changed. Once injection has connected, when you save a file, it will be recompiled and injected into the running app, the new implementations taking place of the old. In the GettingStarted iOS app, if you edit the file DetailViewController.swift to change the string appended after the detail.description in function configureView() then save the file, you can see it take effect straight away. InjectionIII requires a version of Xcode more recent than 10.2, installed at the standard location /Applications/Xcode.app. For a project to be injectable, you must also add "-Xlinker -interposable" to the Debug target of its "Other Linker Flags" build setting. Then, add one of the following to your app’s startup to connect to InjectionIII: Xcode 10.2 and later: #if DEBUG Bundle(path: "/Applications/InjectionIII.app/Contents/Resources/iOSInjection.bundle")?.load() //for tvOS: Bundle(path: "/Applications/InjectionIII.app/Contents/Resources/tvOSInjection.bundle")?.load() //Or for macOS: Bundle(path: "/Applications/InjectionIII.app/Contents/Resources/macOSInjection.bundle")?.load() #endif InjectionIII is able to inject SwiftUI but requires minor code changes to "body" properties to ensure views are redrawn on injection. The easiest way to do this is using the "Prepare Project" menu item after you have selected a project and it will make the necessary changes. If your project is organised across multiple directories, after you have selected the main project, you can add directories to be watched for file changes using the "Add Directory" menu item. This list resets when you select a new project. You'll need to turn sandboxing off to be able to use injection on a macOS application. Consult the project README on the support page for more information.
Scriptable

a-Shell mini

GitHub

App Store Connect

Python3IDE

Stream

Apple Developer

Termius - SSH client

Koder Code Editor

Pyto - Python 3

Bluetooth Terminal
Working Copy - Git client

API Tester: Debug requests
Color Pro Picker

Carnets - Jupyter
 PcMac 한국어