
Pubblicato da Pubblicato da Christoffer Winterkvist
1. If your project is organised across multiple directories, after you have selected the main project, you can add directories to be watched for file changes using the "Add Directory" menu item.
2. InjectionIII requires a version of Xcode more recent than 10.2, installed at the standard location /Applications/Xcode.app. For a project to be injectable, you must also add "-Xlinker -interposable" to the Debug target of its "Other Linker Flags" build setting.
3. You’ll be promoted to select the directory containing the project file and sources to give InjectionIII access to which files have changed.
4. InjectionIII is able to inject SwiftUI but requires minor code changes to "body" properties to ensure views are redrawn on injection.
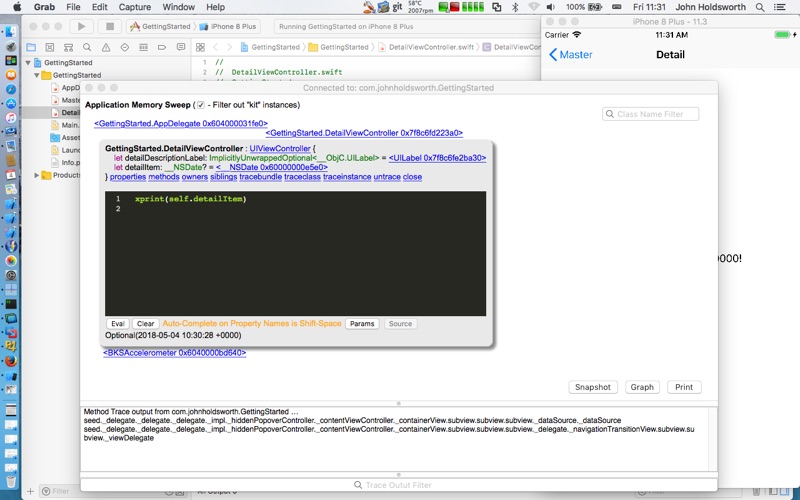
5. This allows you to change the implementations of methods, functions and SwiftUI body properties without having to restart your app for rapid iteration over minor code changes and design.
6. The easiest way to do this is using the "Prepare Project" menu item after you have selected a project and it will make the necessary changes.
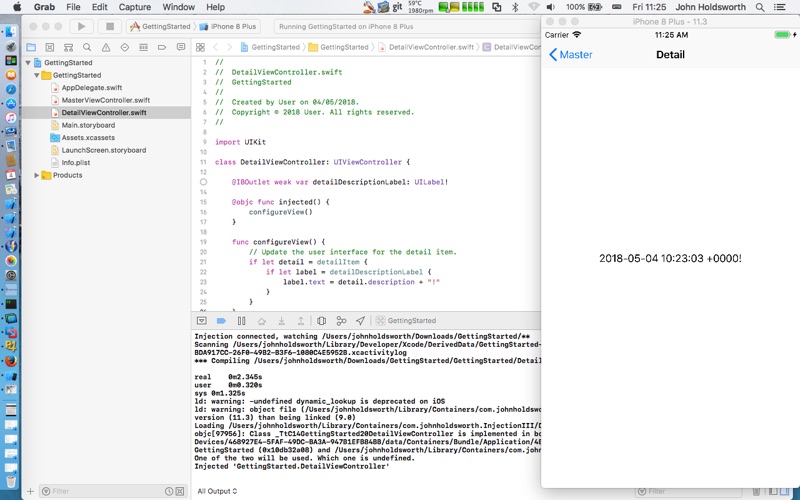
7. In the GettingStarted iOS app, if you edit the file DetailViewController.swift to change the string appended after the detail.description in function configureView() then save the file, you can see it take effect straight away.
8. Once injection has connected, when you save a file, it will be recompiled and injected into the running app, the new implementations taking place of the old.
9. Quite simply, InjectionIII adds "Hot Reloading" capability to your iOS, tvOS and macOS projects written in Swift or Objective-C.
10. Then, download the example project build and run it in Xcode.
11. Consult the project README on the support page for more information.
Controlla app per PC compatibili o alternative
| App | Scarica | la Valutazione | Sviluppatore |
|---|---|---|---|
|
InjectionIII
|
Ottieni app o alternative ↲ | 0 1
|
Christoffer Winterkvist |
Oppure segui la guida qui sotto per usarla su PC :
Scegli la versione per pc:
Requisiti per l'installazione del software:
Disponibile per il download diretto. Scarica di seguito:
Ora apri l applicazione Emulator che hai installato e cerca la sua barra di ricerca. Una volta trovato, digita InjectionIII nella barra di ricerca e premi Cerca. Clicca su InjectionIIIicona dell applicazione. Una finestra di InjectionIII sul Play Store o l app store si aprirà e visualizzerà lo Store nella tua applicazione di emulatore. Ora, premi il pulsante Installa e, come su un iPhone o dispositivo Android, la tua applicazione inizierà il download. Ora abbiamo finito.
Vedrai un icona chiamata "Tutte le app".
Fai clic su di esso e ti porterà in una pagina contenente tutte le tue applicazioni installate.
Dovresti vedere il icona. Fare clic su di esso e iniziare a utilizzare l applicazione.
Ottieni un APK compatibile per PC
| Scarica | Sviluppatore | la Valutazione | Versione corrente |
|---|---|---|---|
| Scarica APK per PC » | Christoffer Winterkvist | 1 | 4.7.5 |
Scarica InjectionIII per Mac OS (Apple)
| Scarica | Sviluppatore | Recensioni | la Valutazione |
|---|---|---|---|
| Free per Mac OS | Christoffer Winterkvist | 0 | 1 |

App Store Connect

GitHub

Scriptable

Bluetooth Terminal

Termius: Terminal & SSH client

xTerminal - SSH Terminal Shell

Apple Developer

Pyto - Python 3

Sharalike Multi Product

WebSSH

Device Monitor²

Python3IDE

Gaia VPN - Unlimited proxy X

Stream

ServerCat - Linux Status & SSH
 PcMac Italiano