
投稿者 Zoho Corporation
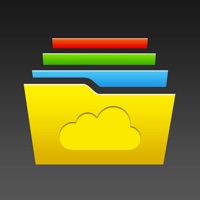
1. The uploaded receipts will be auto-scanned and expenses will be created automatically in Zoho Expense.
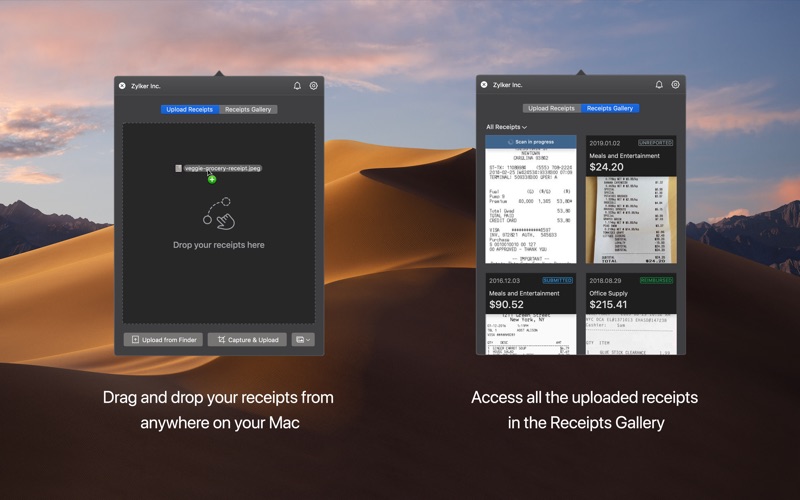
2. Upload receipts from anywhere directly into your Zoho Expense account.
3. • Right-click any receipt in your Finder and choose Upload to Zoho Expense.
4. Create an expense report with these expenses in the web app or the mobile app and send it for approval with just a few clicks.
5. • Capture any part of the screen and upload using the clipping tool.
6. • Drag and drop receipts in the app from your mac.


または、以下のガイドに従ってPCで使用します :
PCのバージョンを選択してください:
ソフトウェアのインストール要件:
直接ダウンロードできます。以下からダウンロード:
これで、インストールしたエミュレータアプリケーションを開き、検索バーを探します。 一度それを見つけたら、 Receipt Inbox for Zoho Expense を検索バーに入力し、[検索]を押します。 クリック Receipt Inbox for Zoho Expenseアプリケーションアイコン。 のウィンドウ。 Receipt Inbox for Zoho Expense - Playストアまたはアプリストアのエミュレータアプリケーションにストアが表示されます。 Installボタンを押して、iPhoneまたはAndroidデバイスのように、アプリケーションのダウンロードが開始されます。 今私達はすべて終わった。
「すべてのアプリ」というアイコンが表示されます。
をクリックすると、インストールされているすべてのアプリケーションを含むページが表示されます。
あなたは アイコン。 それをクリックし、アプリケーションの使用を開始します。
ダウンロード Receipt Inbox Mac OSの場合 (Apple)
| ダウンロード | 開発者 | レビュー | 評価 |
|---|---|---|---|
| Free Mac OSの場合 | Zoho Corporation | 0 | 1 |
Zoho Docs

Zoho Invoice Maker App

Zoho CRM - Sales & Marketing

ServiceDesk Plus | On-premises

ManageEngine Ping Tool

ZOOM Cloud Meetings

マイナポイント

Microsoft Teams

Adobe Acrobat Reader: PDF書類の管理

LINE WORKS ビジネスチャット

Google Meet

Indeed 求人検索(バイト・仕事探し)

Slack

セコム安否確認サービス 安否報告アプリ

Webex Meetings

Adobe Scan: OCR 付 スキャナーアプリ

LINE公式アカウント

YOUTRUST

通話録音-最も簡単な電話録音ソフトウェア

PCM録音
 PcMac 日本語