
投稿者 Expensify, Inc.
1. Payment for the Expensify subscription will be charged to your iTunes Account at confirmation of purchase and will automatically renew monthly unless auto-renew is turned off at least 24 hours before to the end of the current period.
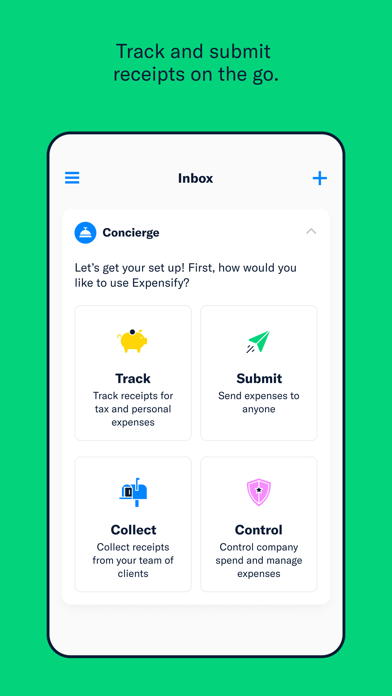
2. Expense management: Expensify codes and submits business expenses for easy approval, next-day reimbursement, and automatic sync with accounting software.
3. Any unused portion of a free trial period, if offered, will be forfeited when you purchase a subscription to that publication, where applicable.
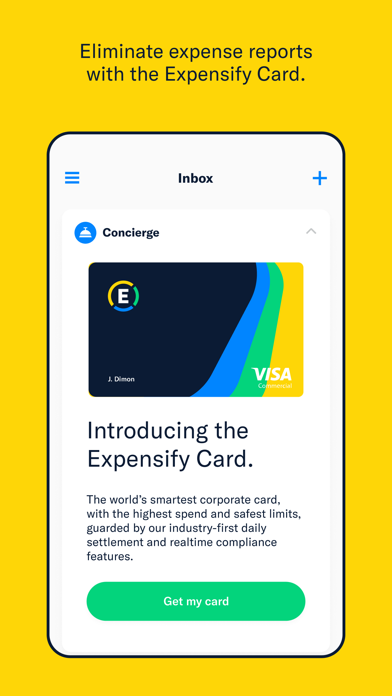
4. Corporate card purchases: Just swipe the Expensify Card and your expenses are done.
5. You can manage your subscription and auto-renewal may be turned off by going to your Account Settings after purchase.
6. Scan receipts, track business and personal expenses, and book travel all in one app.
7. Your account will be charged for renewal within 24-hours prior to the end of the current period.
8. Download Expensify today and join millions of people worldwide managing their spend stress-free.
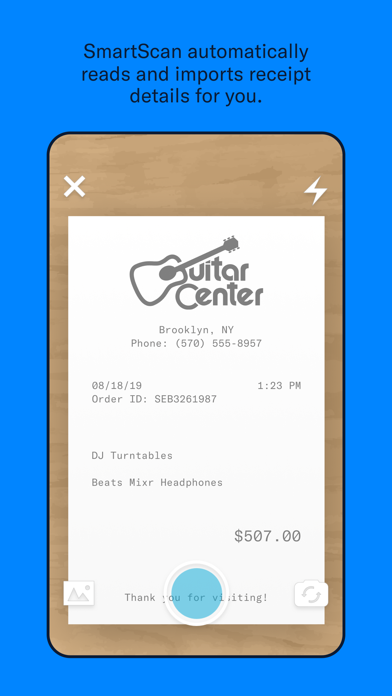
9. Unlimited receipt scanning: Snap a photo of any receipt and Expensify’s SmartScan technology captures the details.
10. Better yet, get the Expensify Card and say goodbye to receipts forever.
11. Travel booking: Concierge books your flights, hotels, and cars for you in one simple chat.

互換性のあるPCアプリまたは代替品を確認してください
| 応用 | ダウンロード | 評価 | 開発者 |
|---|---|---|---|
| expensify |
アプリまたは代替を取得 | 4.5266/5 564 レビュー 4.5266 |
Expensify, Inc. |
または、以下のガイドに従ってPCで使用します :
PCのバージョンを選択してください:
インストールして使用したい場合は Expensify: Receipts & Expenses あなたのPCまたはMac上のアプリをダウンロードするには、お使いのコンピュータ用のデスクトップアプリケーションエミュレータをダウンロードしてインストールする必要があります。 私たちはあなたの使い方を理解するのを助けるために尽力しました。 app を以下の4つの簡単なステップでコンピュータにインストールしてください:
OK。 最初のものが最初に。 お使いのコンピュータでアプリケーションを使用するには、まずMacストアまたはWindows AppStoreにアクセスし、Bluestacksアプリまたは Nox App Web上のチュートリアルのほとんどはBluestacksアプリを推奨しています。あなたのコンピュータでBluestacksアプリケーションの使用に問題がある場合は、簡単にソリューションをオンラインで見つける可能性が高くなるため、推奨するように誘惑されるかもしれません。 Bluestacks PcまたはMacソフトウェアは、 ここ でダウンロードできます。.
これで、インストールしたエミュレータアプリケーションを開き、検索バーを探します。 一度それを見つけたら、 Expensify: Receipts & Expenses を検索バーに入力し、[検索]を押します。 クリック Expensify: Receipts & Expensesアプリケーションアイコン。 のウィンドウ。 Expensify: Receipts & Expenses - Playストアまたはアプリストアのエミュレータアプリケーションにストアが表示されます。 Installボタンを押して、iPhoneまたはAndroidデバイスのように、アプリケーションのダウンロードが開始されます。 今私達はすべて終わった。
「すべてのアプリ」というアイコンが表示されます。
をクリックすると、インストールされているすべてのアプリケーションを含むページが表示されます。
あなたは アイコン。 それをクリックし、アプリケーションの使用を開始します。
PC用の互換性のあるAPKを取得
| ダウンロード | 開発者 | 評価 | スコア | 現在のバージョン | 互換性 |
|---|---|---|---|---|---|
| APKを確認してください → | Expensify, Inc. | 564 | 4.5266 | 8.5.35.4 | 4+ |
ボーナス: ダウンロード Expensify iTunes上で
| ダウンロード | 開発者 | 評価 | スコア | 現在のバージョン | アダルトランキング |
|---|---|---|---|---|---|
| 無料 iTunes上で | Expensify, Inc. | 564 | 4.5266 | 8.5.35.4 | 4+ |
Windows 11でモバイルアプリを使用するには、AmazonAppstoreをインストールする必要があります。 設定が完了すると、厳選されたカタログからモバイルアプリを閲覧してインストールできるようになります。 Windows 11でAndroidアプリを実行したい場合は、このガイドが役立ちます。.

ZOOM Cloud Meetings

マイナポイント

Microsoft Teams

Adobe Acrobat Reader: PDF書類の管理

LINE WORKS ビジネスチャット

Google Meet

Indeed 求人検索(バイト・仕事探し)

Slack

セコム安否確認サービス 安否報告アプリ

Webex Meetings

Adobe Scan: OCR 付 スキャナーアプリ

LINE公式アカウント

YOUTRUST

通話録音-最も簡単な電話録音ソフトウェア

PCM録音
 PcMac 日本語