Manage Imports for XCode for pc and mac

Manage Imports for XCode for Pc

Written by Innervate


Get a Compatible APK for PC


Download Developer Rating Score Current version Adult Ranking
Check for APK → Innervate 0 0 1.0 4+

App Screenshots


Software Features and Description

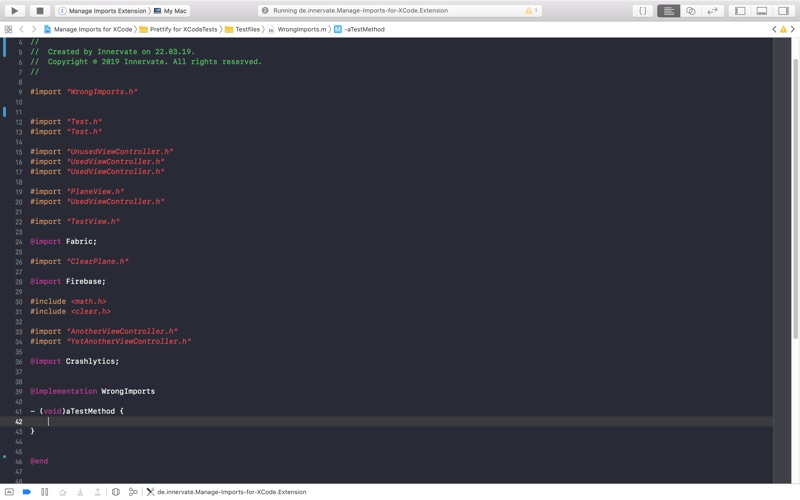
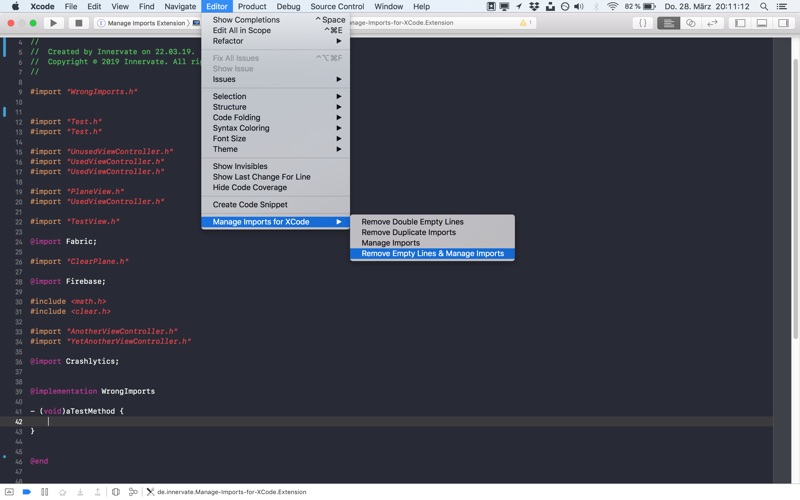
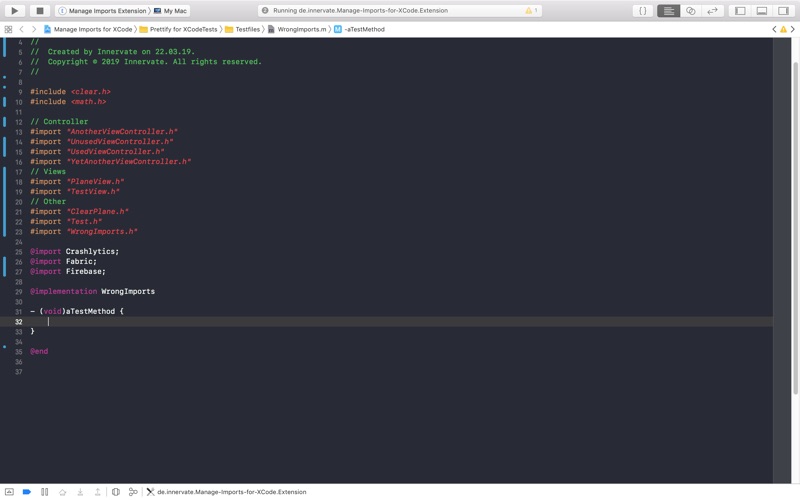
1. • Group Imports by category for Controllers, Views, Logic, Manager, CoreData etc.

2. XCode is a trademark of Apple Inc., registered in the U.S. and other countries.

3. Manage Imports for XCode is not affiliated with Apple, Inc.

4. Liked Manage Imports? here are 5 Developer Tools apps like Squadcast Incident management; nRF Connect Device Manager; WISE - (Stacks Wallet Manager); GitHub; Text Editor.;


Download and install Manage Imports for XCode on your computer


Hurray! Seems an app like manage imports is available for Windows! Download below:

SN App Download Review Maker
1 Manage It - Project Manager Download 3.8/5
48 Reviews
3.8
marcucio
2 Manage Expense Download 2.6/5
14 Reviews
2.6
Creative Tech
3 PaletteBook - Create and manage your color palettes Download 4/5
0 Reviews
4
Colin Kiama

Not satisfied? Check for compatible PC Apps or Alternatives


App Download Rating Maker
pc app manage imports Get App or Alternatives 0 Reviews
0
Innervate
Or follow the guide below to use on PC:

Select Windows version:

  1. Windows 7-10
  2. Windows 11

Download and install the Manage Imports for XCode app on your Windows 10,8,7 or Mac in 4 simple steps below:


  1. Download an Android emulator for PC and Mac:
    Get either Bluestacks or the Nox App >> . We recommend Bluestacks because you can easily find solutions online if you run into problems while using it. Download Bluestacks Pc or Mac software Here >> .

  2. Install the emulator on your PC or Mac:
    On your computer, goto the Downloads folder » click to install Bluestacks.exe or Nox.exe » Accept the License Agreements » Follow the on-screen prompts to complete installation.

  3. Using Manage Imports on PC [Windows 7/ 8/8.1/ 10/ 11]:
    • Open the Emulator app you installed » goto its search bar and search "Manage Imports"
    • The search will reveal the Manage Imports for XCode app icon. Open, then click "Install".
    • Once Manage Imports is downloaded inside the emulator, locate/click the "All apps" icon to access a page containing all your installed applications including Manage Imports.
    • Now enjoy Manage Imports on PC.

  4. Using Manage Imports on Mac OS:
    Install Manage Imports for XCode on your Mac using the same steps for Windows OS above.


How to download and use Manage Imports App on Windows 11


To get Manage Imports on Windows 11, check if there's a native Manage Imports Windows app here » ». If none, follow the steps below:


  1. Download the Amazon-Appstore » (U.S only)
    • Click on "Get" to begin installation. It also automatically installs Windows Subsystem for Android.
    • After installation, Goto Windows Start Menu or Apps list » Open the Amazon Appstore » Login (with Amazon account)

  2. For non-U.S users, Download the OpenPC software »
    • Upon installation, open OpenPC app » goto Playstore on PC » click Configure_Download. This will auto-download Google Play Store on your Windows 11.

  3. Installing Manage Imports:
    • Login to your computer's PlayStore or Amazon AppStore.
    • Search for "Manage Imports" » Click "Install" to install Manage Imports for XCode
    • Manage Imports for XCode will now be available on your windows start-menu.

Minimum requirements Recommended
  • 8GB RAM
  • SSD Storage
  • Processor: Intel Core i3, AMD Ryzen 3000
  • Architecture: x64 or ARM64
  • 16GB RAM
  • HDD Storage

Manage Imports for XCode On iTunes


Download Developer Rating Score Current version Adult Ranking
$0.99 On iTunes Innervate 0 0 1.0 4+

Download on Android: Download Android


Similar Developer Tools apps


More apps from the Developer