投稿者 Boinx Software International GmbH
1. Since he didn't have time to prepare a slideshow and didn't know what order to put the photos and videos in, he searched for an app that would allow him to randomly pick photos or videos from the photo roll and display those in a nonlinear presentation on a screen connected via AirPlay or HDMI as he went along with his story.
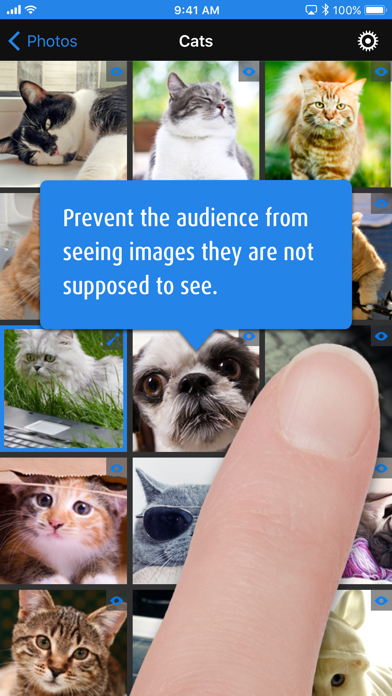
2. The challenge was that there were some pictures and video in his photo roll he didn't want the audience to see.
3. Simply hook up your iPhone, or iPad to an HDTV set, a projector with HDMI or VGA (for example by using the Lightning Digital AV Adapter), via AirPlay or send your signal into an NDI-enabled broadcast workflow such as mimoLive for Mac.
4. Following your conversation, you'll want to pick specific photos or videos for your client to see.
5. Next, browse your photo library to find the photo or video you want to show.
6. Use the built-in Laser Pointer tool to point out features of your photos or highlight an area with the Mouseposé-inspired spotlight effect.
7. He figured the best way would be to show some pictures of people using it and videos that were made with it.
8. Maybe you have multiple versions of the same motif and want to pick the best? There is a preview mode for that.
9. A valid subscription allows you to remove the “PhotoPresenter” badge from the NDI® output.
10. Imagine your grandparents asking you to see photos from your great holiday.
11. Bastian, our video guru, once was asked to host a workshop about our app iStopMotion on very short notice.


互換性のあるPCアプリまたは代替品を確認してください
| 応用 | ダウンロード | 評価 | 開発者 |
|---|---|---|---|
|
PhotoPresenter
|
アプリまたは代替を取得 ↲ | 9 3.67
|
Boinx Software International GmbH |
または、以下のガイドに従ってPCで使用します :
PCのバージョンを選択してください:
ソフトウェアのインストール要件:
直接ダウンロードできます。以下からダウンロード:
これで、インストールしたエミュレータアプリケーションを開き、検索バーを探します。 一度それを見つけたら、 PhotoPresenter を検索バーに入力し、[検索]を押します。 クリック PhotoPresenterアプリケーションアイコン。 のウィンドウ。 PhotoPresenter - Playストアまたはアプリストアのエミュレータアプリケーションにストアが表示されます。 Installボタンを押して、iPhoneまたはAndroidデバイスのように、アプリケーションのダウンロードが開始されます。 今私達はすべて終わった。
「すべてのアプリ」というアイコンが表示されます。
をクリックすると、インストールされているすべてのアプリケーションを含むページが表示されます。
あなたは アイコン。 それをクリックし、アプリケーションの使用を開始します。
PC用の互換性のあるAPKを取得
| ダウンロード | 開発者 | 評価 | 現在のバージョン |
|---|---|---|---|
| ダウンロード PC 用 APK » | Boinx Software International GmbH | 3.67 | 4.1 |
ダウンロード PhotoPresenter Mac OSの場合 (Apple)
| ダウンロード | 開発者 | レビュー | 評価 |
|---|---|---|---|
| Free Mac OSの場合 | Boinx Software International GmbH | 9 | 3.67 |
You Gotta See This!

iStopMotion

iStopMotion Remote Camera
PhotoPresenter
PartySnapper – The Social Photo Wall App That Will Wow Your Party Guests

YouTube

年賀状 2022 スマホで写真年賀状
Google フォト
CapCut - 動画編集アプリ

Picsart 写真&動画編集アプリ

年賀状 2022 つむぐ年賀で写真入りデザイン作成や自宅印刷
Canon PRINT Inkjet/SELPHY

EPIK エピック - 写真編集

Remini - 高画質化するAI写真アプリ

InShot - 動画編集&動画作成&動画加工

SODA ソーダ

BeautyPlus-可愛い自撮りカメラ、写真加工フィルター

Canva-インスタストーリー,年賀状デザイン作成や写真編集

LINEスタンプメーカー
 PcMac 日本語